Mybatis 源码学习笔记
刘慈欣
面向宇宙,我们只是一粒尘埃, 而面向我们自己,宇宙只是一具尸体。
# Mybatis 简介
MyBatis 是一个持久层的 ORM 框架,使用简单,学习成本较低。可以执行自己手 写的SQL语句,比较灵活。但是MyBatis的自动化程度不高,移植性也不高,有 时从一个数据库迁移到另外一个数据库的时候需要自己修改配置,所以称只为半 自动ORM框架
Mybatis 在传统 JDBC 的基础上,主要解决了如下问题:
- 提供其强大的配置能力,用户可以通过配置 XML 文件很方便地开启或者关闭功能。
- 允许用户配置数据库连接池,使用连接池来管理数据库连接,减少频繁创建、释放连接资源带来的额外系统开销。
- 解除 SQL 和 Java 代码的耦合,将 SQL 配置在 XxxMapper.xml 中,极大减轻代码的维护成本。
- 使用参数映射的方式解决了向 SQL 传参的问题,自动将 Java 对象映射到 SQL 语句中参数占位符。
- 使用结果集映射的方式解决了 SQL 执行结果转换的问题,自动将 SQL 执行解决映射到 Java 对象,用户可以通过设置 resultType 来自定义输出结果类型。
# Mybatis 体系结构
Mybatis 的目录结构
ibatis
├── annotations // 注解定义模块
├── binding // 绑定 Mapper 接口和 XML 文件,MapperRegistry, MapperProxyFactory 等都定义在这个模块下。
├── builder // 配置解析模块,将 xml 配置文件以及映射文件解析封装到 Configuration 对象中
├── cache // 缓存模块,包括一级缓存和二级缓存
├── cursor // 游标查询模块
├── datasource // 数据源模块
├── exceptions // 异常定义
├── executor // 执行器模块,负责 SQL 的执行以及结果映射处理
├── io // 资源加载,Resources 处理
├── jdbc // JDBC 相关操作
├── lang
├── logging // 日志操作模块
├── mapping Mapper 相关的 Java 类,如 MappedStatement, ResultMap, ParameterMap 等
├── parsing // 解析器模块
├── plugin // 插件模块
├── reflection // 反射模块
├── scripting // 动态 SQL 解析
├── session // SQL 会话
├── transaction // 事务
├── type // 内置的类型处理器
└── util // 工具类

整个 Mybatis 分为三层:
# 1. 基础支撑层
基础支撑负责 Mybatis 的最基础的功能支撑。主要负责处理以下事务:
- 解析并加载 Mybatis 的全局配置 xml 文档(
mybatis-config.xml)。 - 解析 Mapper xml 文件, 将 Mapper xml 文件和 Mapper 接口绑定,生成 MappedStatement 对象。
- 解析 Mapper 接口上的注解,并生成 MappedStatement 对象。
- Mybatis 缓存管理,连接池管理,事务管理。
# 3. 数据处理层
处理一次 SQL 执行的全过程流程。这里以查询操作为例,其主要执行流程就 2 步:
- 通过 Statement ID 去全局配置 configuration 拿到 MappedStatement 对象
MappedStatement ms = configuration.getMappedStatement(statement); - 通过执行器去执行查询操作并返回。执行的具体流程是: 参数解析 -> SQL 解析 -> SQL 执行 -> 结果集映射。这其中还有很多细节处理,比如缓存的调用,事务管理,连接池调用等,这个在后面的流程中会一一分析。
return executor.query(ms, wrapCollection(parameter), rowBounds, handler);
# 3. 接口层
其核心是 SqlSession 接口,它暴露了 Mybatis 与上层应用交互的接口,主要就是 CRUD 接口,以及事务的提交,回滚等接口。除此之外,SqlSession 还给用户提供了一个 getConfiguration() 来获取 Mybatis 全局配置。
SqlSession 的接口调用支持 2 种方式:
第一种是通过 Statement ID 来进行调用, 在 Mybatis 中每一个 Statement 对象都代表着一次 SQL 执行调用。
SqlSession session = sqlSessionFactory.openSession();
Object o = session.selectOne("org.mybatis.demo.mapper.UserMapper.selectUser");
System.out.println(o);
每个 Statement 对象都有一个唯一的 ID, 其生成规则就是在解析 Mapper xml 文件的时候,先拿到 <mapper> 的 namespace 属性,而 mapper 的每一个子节点都有一个唯一的 id 属性,
这样串起来就得到 Statement 的 ID:
<mapper namespace="org.mybatis.demo.mapper.UserMapper">
  <!-- 每一个子节点都有一个唯一的 id 属性 -->
  <select id="selectUser" resultType="org.mybatis.demo.domain.User">
    select * from user limit 0,1
  </select>
</mapper>
第二种调用方式是通过 Mapper 接口来调用。因为毕竟 Statement ID 并不好找,使用起来语义性不强,通常 IDE 也没有提示。所以通常我们用得多的还是第二种方式。 先通过 SqlSession 对象去获取 Mapper 代理对象,然后通过代理对象调用 Mapper 的 API。
 SqlSession session = sqlSessionFactory.openSession();
UserMapper mapper = session.getMapper(UserMapper.class);
User user = mapper.selectUser();
System.out.println(user);
# 解析器设计
Mybatis 的解析器主要有 5 种:
- XMLConfigBuilder: 全局配置文件(
mybatis-config.xml) 解析器,主要解析 properties 配置文档,全局设置,插件,TypeAliases 等。 - XMLMapperBuilder: Mapper XML 文件解析器,负责解析二级缓存,ResultMap 等信息。
- MapperBuilderAssistant: Mapper 解析器助手工具,协助 XMLMapperBuilder 解析二级缓存,ResultMap 等,创建 MappedStatement 对象。
- XMLStatementBuilder: CURD 元素解析器。
- XMLScriptBuilder: SQL 语句解析器,解析动态 SQL(
${}) 和静态 SQL 语句(#{}),解析成一个一个的 SqlNode 对象。 - SqlSourceBuilder: SQL 最终解析器,将 SqlNode 对象整合成最终的 SQL 语句。
解析器的入口在 XMLConfigBuilder.parseConfiguration() 方法,该方法执行完之后将解析到的数据打包放入 Configuration 对象, Configuration 对象将会作为参数传入 SqlSession 和 MappedStatement 等对象中。
private void parseConfiguration(XNode root)
{
    try {
      // issue #117 read properties first
      // K2: 先解析 properties 文件,后面的配置项就可以直接使用 properties 配置
      propertiesElement(root.evalNode("properties"));
      Properties settings = settingsAsProperties(root.evalNode("settings"));
      loadCustomVfs(settings);
      loadCustomLogImpl(settings);
      // 解析类型别名
      typeAliasesElement(root.evalNode("typeAliases"));
      // 解析插件
      pluginElement(root.evalNode("plugins"));
      /**
       * 解析对象创建工厂,通常这个用户都不会配置,使用内置的默认实现:
       * @see org.apache.ibatis.reflection.factory.DefaultObjectFactory
       */
      objectFactoryElement(root.evalNode("objectFactory"));
      objectWrapperFactoryElement(root.evalNode("objectWrapperFactory"));
      /**
       * 解析反射工厂,通常这个用户都不会配置,使用内置的默认实现:
       * @see org.apache.ibatis.reflection.DefaultReflectorFactory
       */
      reflectorFactoryElement(root.evalNode("reflectorFactory"));
      // 解析配置全局配置
      settingsElement(settings);
      // read it after objectFactory and objectWrapperFactory issue #631
      environmentsElement(root.evalNode("environments"));
      databaseIdProviderElement(root.evalNode("databaseIdProvider"));
      // 解析用户自定义的 TypeHandler,
      typeHandlerElement(root.evalNode("typeHandlers"));
      // 扫描 mapper xml 文件并解析 Mapper 接口
      mapperElement(root.evalNode("mappers"));
    } catch (Exception e) {
      throw new BuilderException("Error parsing SQL Mapper Configuration. Cause: " + e, e);
    }
}
# 缓存设计
Mybatis 的缓存分为一级缓存和二级缓存。这两缓存的作用域和实现方式都有所有不同。
# 一级缓存
- 作用范围: 仅限当前 SqlSession
- 缓存实现: 实现简单,直接用 PerpetualCache 对象(底层实现就是一个 HashMap)。
一级缓存的生命周期很短,只有在同一个 session 中执行相同的 SQL 语句的时候才会命中一级缓存,当执行增,删,改,之类的写操作的时候,一级缓存会清空。
public int update(MappedStatement ms, Object parameter) throws SQLException
{
    ErrorContext.instance().resource(ms.getResource()).activity("executing an update").object(ms.getId());
    if (closed) {
      throw new ExecutorException("Executor was closed.");
    }
    clearLocalCache();
    return doUpdate(ms, parameter);
}
而且,当执行事务提交或者回滚的时候,一级缓存也会清空。
// session 提交的时候会清空一级缓存
public void commit(boolean required) throws SQLException
{
    if (closed) {
      throw new ExecutorException("Cannot commit, transaction is already closed");
    }
    clearLocalCache();
    flushStatements();
    if (required) {
      transaction.commit();
    }
}

// session 回滚的时候也会清空一级缓存
public void rollback(boolean required) throws SQLException
{
    if (!closed) {
      try {
        clearLocalCache();
        flushStatements(true);
      } finally {
        if (required) {
          transaction.rollback();
        }
      }
    }
}
# 二级缓存
- 作用范围: 应用级别,在当前应用范围内都是有效的。
- 实现方式: 基于责任链和装饰器模式实现。
Mybatis 二级缓存的实现使用了责任链 + 装饰器设计模式。缓存的具体实现类是 PerpetualCache,
其他缓存是通过装饰器模式对 PerpetualCache 一层包一层包装,每一层负责不同的责任。
缓存调用的时候则是通过一层一层的委托调用的方式。
比如日志缓存(LoggingCache)只负责记录日志,同步缓存(SynchronizedCache) 只是在读写方法上加上同步锁...
// 日志缓存
public class LoggingCache implements Cache {
    public Object getObject(Object key) {
        requests++;
        final Object value = delegate.getObject(key);
        if (value != null) {
            hits++;
        }
        // LoggingCache 的职责就是在读取数据的时候打印日志
        if (log.isDebugEnabled()) {
            log.debug("Cache Hit Ratio [" + getId() + "]: " + getHitRatio());
        }
        return value;
  }
}

// 同步缓存
public class SynchronizedCache implements Cache {
    ...
    // 只是加了同步锁,内部直接调用委托对象的方法
    public synchronized void putObject(Object key, Object object) {
        delegate.putObject(key, object);
    }

    public synchronized Object getObject(Object key) {
        return delegate.getObject(key);
    }
    ...
}
缓存的工作流程如下图所示:

代码实现在 CacheBuilder.build() 方法中:
public Cache build() {
    setDefaultImplementations();
    Cache cache = newBaseCacheInstance(implementation, id);
    setCacheProperties(cache);
    // issue #352, do not apply decorators to custom caches
    if (PerpetualCache.class.equals(cache.getClass())) {
      for (Class<? extends Cache> decorator : decorators) {
        cache = newCacheDecoratorInstance(decorator, cache);
        setCacheProperties(cache);
      }
      // K2: 给底层缓存添加装饰器,一层包一层
      cache = setStandardDecorators(cache);
    } else if (!LoggingCache.class.isAssignableFrom(cache.getClass())) {
      cache = new LoggingCache(cache);
    }
    return cache;
}

private Cache setStandardDecorators(Cache cache) {
    // 采用装饰器+责任链设计模式,每一层缓存都负责不同的职责
    try {
      MetaObject metaCache = SystemMetaObject.forObject(cache);
      if (size != null && metaCache.hasSetter("size")) {
        metaCache.setValue("size", size);
      }
      if (clearInterval != null) {
        cache = new ScheduledCache(cache);
        ((ScheduledCache) cache).setClearInterval(clearInterval);
      }
      if (readWrite) {
        // SerializedCache 负责在数据存入和取出的时候对数据进行序列化和反序列化
        // 所以通常要求实体对象(User) 需要实现 Serializable 接口
        cache = new SerializedCache(cache);
      }
      cache = new LoggingCache(cache);
      cache = new SynchronizedCache(cache);
      if (blocking) {
        cache = new BlockingCache(cache);
      }
      return cache;
    } catch (Exception e) {
      throw new CacheException("Error building standard cache decorators.  Cause: " + e, e);
    }
}
说明
为了保持 session 之间的事务隔离性,避免脏读,Mybatis 在实现二级缓存的时候,会为每个 session 建立一个缓存暂存区。 在操作缓存的时候都是先操作缓存暂存区,事务提交或者回滚之后,在把缓存从暂存区移动到二级缓存。
public <E> List<E> query(MappedStatement ms, Object parameterObject, RowBounds rowBounds, ResultHandler resultHandler, CacheKey key, BoundSql boundSql)
    throws SQLException
{
    // 判断当前 Mapper 中是开启了缓存(mapper xml 文档中是否配置了<cache></cache>)
    Cache cache = ms.getCache();
    if (cache != null) {
      // 先判断是否需要刷新缓存
      flushCacheIfRequired(ms);
      if (ms.isUseCache() && resultHandler == null) {
        ensureNoOutParams(ms, boundSql);
        // 先从从当前会话的缓存暂存区 TransactionalCacheManager 读取二级缓存
        @SuppressWarnings("unchecked")
        List<E> list = (List<E>) tcm.getObject(cache, key);
        if (list == null) {
          // 没有命中缓存则从数据库去查询
          list = delegate.query(ms, parameterObject, rowBounds, resultHandler, key, boundSql);
          // 将结果加入缓存
          tcm.putObject(cache, key, list); // issue #578 and #116
        }
        return list;
      }
    }

    // 配置二级缓存的,直接去数据库查询
    return delegate.query(ms, parameterObject, rowBounds, resultHandler, key, boundSql);
}
# SQL 语句解析
Mybatis SQL 语句解析的主要流程:
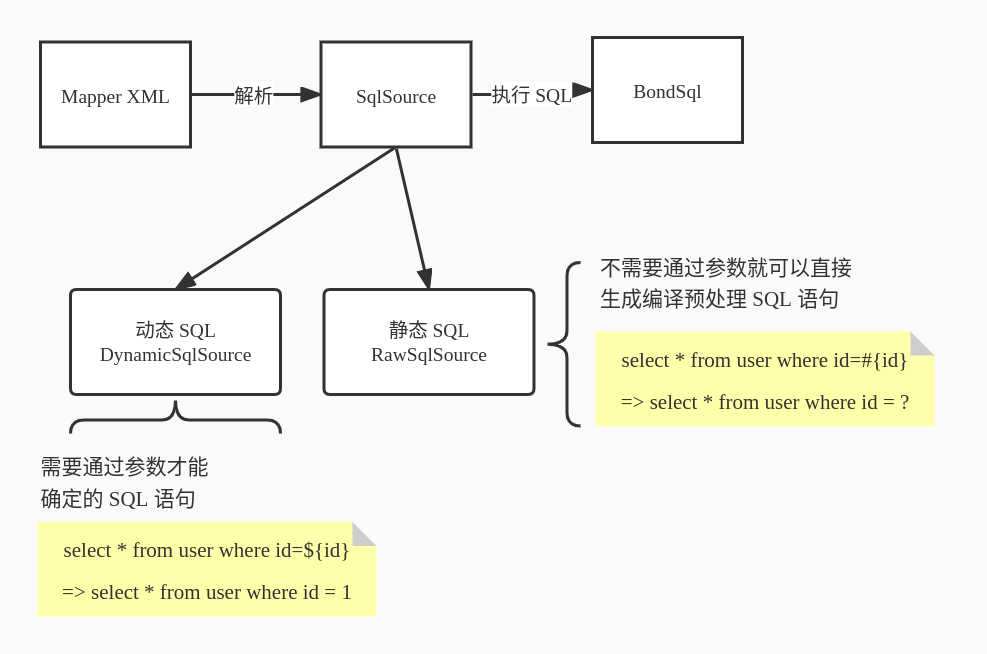
静态 SQL 的解析比较简单,直接把参数传入进去就可以得到一条具体的 SQL 了。
public BoundSql getBoundSql(Object parameterObject) {
    return sqlSource.getBoundSql(parameterObject);
}
而动态 SQL 解析需要从根节点一直往下执行,最终得到完整的 SQL
public BoundSql getBoundSql(Object parameterObject) {
    DynamicContext context = new DynamicContext(configuration, parameterObject);
    // 从根节点开始执行
    rootSqlNode.apply(context);
    SqlSourceBuilder sqlSourceParser = new SqlSourceBuilder(configuration);
    Class<?> parameterType = parameterObject == null ? Object.class : parameterObject.getClass();
    SqlSource sqlSource = sqlSourceParser.parse(context.getSql(), parameterType, context.getBindings());
    BoundSql boundSql = sqlSource.getBoundSql(parameterObject);
    context.getBindings().forEach(boundSql::setAdditionalParameter);
    return boundSql;
}

// 根节点把所有的子节点拿出再调用 apply 方法,形成一个递归调用
public boolean apply(DynamicContext context) {
    contents.forEach(node -> node.apply(context));
    return true;
}
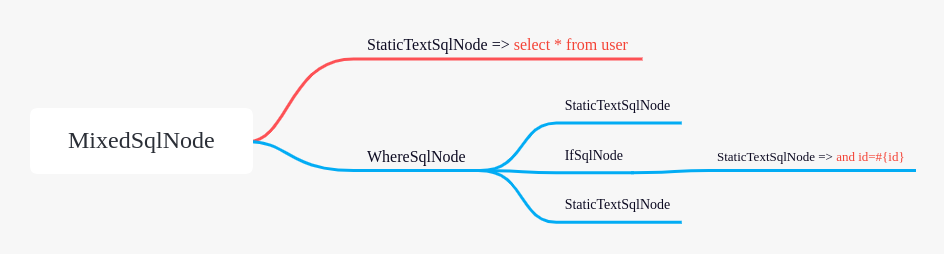
在具体解析某一条 SQL 语句的时候,Mybatis 是将这条 SQL 语句解析成一颗 SqlNode 树。
<select id="selectUser"  resultType="org.mybatis.demo.domain.User">
    select id,name,from user
    <where>
        <if test="id > 0">
            and id=#{id}
        </if>
    </where>
</select>
解析出来的 SqlNode 树如下图所示
# SQL 语句的执行
这一部分应该是属于 Mybatis 核心了,我们通过一个完整的使用实例来解析这个过程:
// 加载 XML 资源文件
InputStream inputStream = Resources.getResourceAsStream("mybatis-config.xml");
//  解析 XML 构建 Configuration, 创建 DefaultSqlSessionFactory 对象
SqlSessionFactory sqlSessionFactory = new SqlSessionFactoryBuilder().build(inputStream);
// 创建一个会话 DefaultSqlSession
SqlSession session = sqlSessionFactory.openSession();
// 获取 Mapper 代理对象
UserMapper mapper = session.getMapper(UserMapper.class);
// 调用 Mapper 接口,底层就是调用 JDBC 的 selectOne() 方法
User user = mapper.selectUser();
System.out.println(user);
主体分为 4 个流程
- 解析 XML 配置,构建
Configuration对象,传入 DefaultSqlSessionFactory 对象。public SqlSessionFactory build(Configuration config) { return new DefaultSqlSessionFactory(config); } - 创建 SqlSession 会话
- 获取 Mapper 代理对象
- 调用 Mapper 接口执行 CRUD 方法
配置的解析流程前面已经讲过,不再赘述,接下来重点看下后面三个流程。
# 创建 SqlSession 会话流程
具体实现在 DefaultSqlSessionFactory.openSessionFromDataSource()
// 创建 SqlSession
private SqlSession openSessionFromDataSource(ExecutorType execType, TransactionIsolationLevel level, boolean autoCommit) {
    Transaction tx = null;
    try {
      // 获取环境变量
      final Environment environment = configuration.getEnvironment();
      // 创建事务管理器
      final TransactionFactory transactionFactory = getTransactionFactoryFromEnvironment(environment);
      tx = transactionFactory.newTransaction(environment.getDataSource(), level, autoCommit);
      // 创建 SQL 执行器,如果配置开启了缓存,则会将执行器包装成 CachingExecutor
      final Executor executor = configuration.newExecutor(tx, execType);
      return new DefaultSqlSession(configuration, executor, autoCommit);
    } catch (Exception e) {
      closeTransaction(tx); // may have fetched a connection so lets call close()
      throw ExceptionFactory.wrapException("Error opening session.  Cause: " + e, e);
    } finally {
      ErrorContext.instance().reset();
    }
}

// 创建执行器

public Executor newExecutor(Transaction transaction, ExecutorType executorType) {
    executorType = executorType == null ? defaultExecutorType : executorType;
    Executor executor;
    // 根据配置创建不同的执行器,默认为 SimpleExecutor
    if (ExecutorType.BATCH == executorType) {
      executor = new BatchExecutor(this, transaction);
    } else if (ExecutorType.REUSE == executorType) {
      executor = new ReuseExecutor(this, transaction);
    } else {
      executor = new SimpleExecutor(this, transaction);
    }
    // cacheEnabled 默认值为 true,开启二级缓存
    if (cacheEnabled) {
      executor = new CachingExecutor(executor);
    }
    // 应用插件,使用 InterceptorChain 生成代理对象
    executor = (Executor) interceptorChain.pluginAll(executor);
    return executor;
}
创建 SqlSession 的过程:
- 创建事务管理器
- 创建 SQL 执行器,如果启用了缓存,再用 CachingExecutor 包一层。如果匹配了插件,则使用 InterceptorChain 生成执行器的代理对象。
- 创建 SqlSession(默认使用 DefaultSqlSession)对象,SqlSession 对象中包含了全局配置 Configuration 对象和执行器 Executor 对象。
三类执行器:
SimpleExecutor: 每执行一次 update 或 select,就开启一个 Statement 对象,用完立刻关闭 Statement 对象。
ReuseExecutor: 使用一个
statementMap来缓存当前 SqlSession 的所有 Statement 对象。每次执行的时候先用 SQL 作为 KeystatementMap查询一下,如果找到了就返回重复使用。private Statement prepareStatement(StatementHandler handler, Log statementLog) throws SQLException { Statement stmt; BoundSql boundSql = handler.getBoundSql(); String sql = boundSql.getSql(); // 先去缓存中查找当前 SQL 是否已经有对应的 Statement,如有直接用缓存 if (hasStatementFor(sql)) { stmt = getStatement(sql); // 更新事务超时时间 applyTransactionTimeout(stmt); } else { // 缓存没有命中,新建一个一个数据库连接 Connection connection = getConnection(statementLog); // 创建一个新的 Statement 并加入缓存中 stmt = handler.prepare(connection, transaction.getTimeout()); putStatement(sql, stmt); } handler.parameterize(stmt); return stmt; }BatchExecutor: 执行 update(没有select,JDBC 批处理不支持select),将所有 sql 都
addBatch()到批处理中,等待统一执行executeBatch(),它缓存了多个Statement对象, 每个Statement对象都是addBatch()完毕后,等待逐一执行executeBatch()批处理。与JDBC批处理相同。public int doUpdate(MappedStatement ms, Object parameterObject) throws SQLException { final Configuration configuration = ms.getConfiguration(); final StatementHandler handler = configuration.newStatementHandler(this, ms, parameterObject, RowBounds.DEFAULT, null, null); final BoundSql boundSql = handler.getBoundSql(); final String sql = boundSql.getSql(); final Statement stmt; if (sql.equals(currentSql) && ms.equals(currentStatement)) { int last = statementList.size() - 1; stmt = statementList.get(last); applyTransactionTimeout(stmt); handler.parameterize(stmt); // fix Issues 322 BatchResult batchResult = batchResultList.get(last); batchResult.addParameterObject(parameterObject); } else { Connection connection = getConnection(ms.getStatementLog()); stmt = handler.prepare(connection, transaction.getTimeout()); handler.parameterize(stmt); // fix Issues 322 currentSql = sql; currentStatement = ms; // 将 Statement 对象缓存起来,等待 FlushStatement 的时候批量执行 statementList.add(stmt); batchResultList.add(new BatchResult(ms, sql, parameterObject)); } // 添加到批处理中统一执行 handler.batch(stmt); return BATCH_UPDATE_RETURN_VALUE; } // FlushStatement public List<BatchResult> doFlushStatements(boolean isRollback) throws SQLException { try { List<BatchResult> results = new ArrayList<>(); // 事务回滚 if (isRollback) { return Collections.emptyList(); } // 将需要批量提交执行的 Statement 从缓存列表中拿出来,分别执行 for (int i = 0, n = statementList.size(); i < n; i++) { Statement stmt = statementList.get(i); applyTransactionTimeout(stmt); BatchResult batchResult = batchResultList.get(i); try { // 执行批处理 batchResult.setUpdateCounts(stmt.executeBatch()); MappedStatement ms = batchResult.getMappedStatement(); List<Object> parameterObjects = batchResult.getParameterObjects(); KeyGenerator keyGenerator = ms.getKeyGenerator(); if (Jdbc3KeyGenerator.class.equals(keyGenerator.getClass())) { Jdbc3KeyGenerator jdbc3KeyGenerator = (Jdbc3KeyGenerator) keyGenerator; jdbc3KeyGenerator.processBatch(ms, stmt, parameterObjects); } else if (!NoKeyGenerator.class.equals(keyGenerator.getClass())) { // issue #141 for (Object parameter : parameterObjects) { keyGenerator.processAfter(this, ms, stmt, parameter); } } // Close statement to close cursor #1109 closeStatement(stmt); } catch (BatchUpdateException e) { StringBuilder message = new StringBuilder(); message .append(batchResult.getMappedStatement().getId()) .append(" (batch index #") .append(i + 1) .append(")") .append(" failed."); if (i > 0) { message .append(" ") .append(i) .append(" prior sub executor(s) completed successfully, but will be rolled back."); } throw new BatchExecutorException(message.toString(), e, results, batchResult); } // 收集批处理结果 results.add(batchResult); } return results; } finally { for (Statement stmt : statementList) { closeStatement(stmt); } currentSql = null; statementList.clear(); batchResultList.clear(); } }
# 获取 Mapper 代理对象流程
进入 sqlSession.getMapper() 方法,会发现调的是 Configration 对象的 getMapper 方法(前面已经知道所有的 Mapper xml 解析之后都封装到 Configuration 对象中了):
public <T> T getMapper(Class<T> type) {
    return configuration.getMapper(type, this);
}

public <T> T getMapper(Class<T> type, SqlSession sqlSession) {
    // mapperRegistry 是一个 Map,里面注册了启动过程中解析的各种 Mapper.xml
    // mapperRegistry 的 key 是接口的 Class类型
    // mapperRegistry 的 Value是 MapperProxyFactory, 用于生成对应的 MapperProxy(动态代理类)
    return mapperRegistry.getMapper(type, sqlSession);
}
继续进入 mapperRegistry.getMapper() 方法:
public <T> T getMapper(Class<T> type, SqlSession sqlSession) {
    // 直接到 Map 中去找,找不到就抛异常
    final MapperProxyFactory<T> mapperProxyFactory = (MapperProxyFactory<T>) knownMappers.get(type);
    if (mapperProxyFactory == null) {
      throw new BindingException("Type " + type + " is not known to the MapperRegistry.");
    }
    try {
      // 找到之后就使用 Mapper 代理工厂创建代理类
      return mapperProxyFactory.newInstance(sqlSession);
    } catch (Exception e) {
      throw new BindingException("Error getting mapper instance. Cause: " + e, e);
    }
}
进入核心方法 MapperProxyFactory.newInstance() 方法:
public T newInstance(SqlSession sqlSession) {
    final MapperProxy<T> mapperProxy = new MapperProxy<>(sqlSession, mapperInterface, methodCache);
    return newInstance(mapperProxy);
}

@SuppressWarnings("unchecked")
protected T newInstance(MapperProxy<T> mapperProxy) {
    // 生成 Mapper 接口的动态代理类 MapperProxy,MapperProxy 实现了 InvocationHandler 接口
    return (T)
      Proxy.newProxyInstance(mapperInterface.getClassLoader(), new Class[] {mapperInterface}, mapperProxy);
}
# Mapper 方法执行流程
上面已经知道 SqlSession.getMapper() 返回的是动态代理类 MapperProxy。那么调用 Mapper 接口的所有的方法都调用 MapperProxy.invoke() 方法:
public class MapperProxy<T> implements InvocationHandler, Serializable {
    ...
    public Object invoke(Object proxy, Method method, Object[] args) throws Throwable {
        try {
          // 判断我们的方法是不是我们的 Object 类定义的方法,若是直接通过反射调用
          if (Object.class.equals(method.getDeclaringClass())) {
            return method.invoke(this, args);
          } else {
            // 调用 Mapper 接口中的方法
            return cachedInvoker(method).invoke(proxy, method, args, sqlSession);
          }
        } catch (Throwable t) {
          throw ExceptionUtil.unwrapThrowable(t);
        }
    }

    // 缓存 mapper 中的方法
    private MapperMethodInvoker cachedInvoker(Method method) throws Throwable {
        try {
          return MapUtil.computeIfAbsent(
              methodCache,
              method,
              m -> {
                // 默认方法
                if (m.isDefault()) {
                  try {
                    if (privateLookupInMethod == null) {
                      return new DefaultMethodInvoker(getMethodHandleJava8(method));
                    } else {
                      return new DefaultMethodInvoker(getMethodHandleJava9(method));
                    }
                  } catch (IllegalAccessException
                      | InstantiationException
                      | InvocationTargetException
                      | NoSuchMethodException e) {
                    throw new RuntimeException(e);
                  }
                } else {
                  // 创建一个 PlainMethodInvoker 实现了 MapperMethodInvoker 接口
                  return new PlainMethodInvoker(
                      new MapperMethod(mapperInterface, method, sqlSession.getConfiguration()));
                }
              });
        } catch (RuntimeException re) {
          Throwable cause = re.getCause();
          throw cause == null ? re : cause;
        }
      }
    ...
}
cachedInvoker() 方法会返回一个 MapperMethodInvoker 对象,它包含了 MapperMethod 对象,它的 invoke() 方法实现很简单,其实就是调用了 MapperMethod.execute() 方法:
public Object invoke(Object proxy, Method method, Object[] args, SqlSession sqlSession)
        throws Throwable {
      return mapperMethod.execute(sqlSession, args);
}
继续进入 MapperMethod.execute() 方法,这个方法判断你当前执行的方式是增删改查哪一种,并通过 SqlSession 执行相应的操作并返回结果:
public Object execute(SqlSession sqlSession, Object[] args) {
    Object result;
    // 判断指令类型,是 CRUD 中的哪一种
    switch (command.getType()) {
      case INSERT:
        {
          Object param = method.convertArgsToSqlCommandParam(args);
          result = rowCountResult(sqlSession.insert(command.getName(), param));
          break;
        }
      case UPDATE:
        {
          Object param = method.convertArgsToSqlCommandParam(args);
          result = rowCountResult(sqlSession.update(command.getName(), param));
          break;
        }
      case DELETE:
        {
          Object param = method.convertArgsToSqlCommandParam(args);
          result = rowCountResult(sqlSession.delete(command.getName(), param));
          break;
        }
      case SELECT:
        if (method.returnsVoid() && method.hasResultHandler()) {
          executeWithResultHandler(sqlSession, args);
          result = null;
        } else if (method.returnsMany()) {
          result = executeForMany(sqlSession, args);
        } else if (method.returnsMap()) {
          result = executeForMap(sqlSession, args);
        } else if (method.returnsCursor()) {
          result = executeForCursor(sqlSession, args);
        } else {
          Object param = method.convertArgsToSqlCommandParam(args);
          result = sqlSession.selectOne(command.getName(), param);
          if (method.returnsOptional()
              && (result == null || !method.getReturnType().equals(result.getClass()))) {
            result = Optional.ofNullable(result);
          }
        }
        break;
      case FLUSH:
        result = sqlSession.flushStatements();
        break;
      default:
        throw new BindingException("Unknown execution method for: " + command.getName());
    }
    if (result == null && method.getReturnType().isPrimitive() && !method.returnsVoid()) {
      throw new BindingException(
          "Mapper method '"
              + command.getName()
              + "' attempted to return null from a method with a primitive return type ("
              + method.getReturnType()
              + ").");
    }
    return result;
}
sqlSession.selectOne 方法会会调到 DefaultSqlSession.selectList 的方法。这个方法获取了获取了 MappedStatement 对象,并最终调用了 Executor.query 方法:
private <E> List<E> selectList(String statement, Object parameter, RowBounds rowBounds, ResultHandler handler) {
    try {
      // 1. 通过全局配置类拿到 MappedStatement
      MappedStatement ms = configuration.getMappedStatement(statement);
      // 2. 通过执行器去执行查询操作
      return executor.query(ms, wrapCollection(parameter), rowBounds, handler);
    } catch (Exception e) {
      throw ExceptionFactory.wrapException("Error querying database.  Cause: " + e, e);
    } finally {
      ErrorContext.instance().reset();
    }
}
然后,通过一层一层的调用,先会去缓存中去查询,如果没有命中就会调用 BaseExecutor.queryFromDatabase 方法从数据库读取(前面缓存模块已经分析过),
最终会来到 Executor.doQuery 方法, 这是一个抽象方法,每个 Executor 都会有自己的实现,这里以 SimpleExecutor 为例:
public <E> List<E> doQuery(MappedStatement ms, Object parameter, RowBounds rowBounds, ResultHandler resultHandler, BoundSql boundSql) throws SQLException {
    Statement stmt = null;
    try {
      Configuration configuration = ms.getConfiguration();
      // 创建 StatementHandler,内部封装了 ParameterHandler(参数处理)和 ResultSetHandler(结果集处理)
      StatementHandler handler = configuration.newStatementHandler(wrapper, ms, parameter, rowBounds, resultHandler, boundSql);
      // 创建 PreparedStatement 对象
      stmt = prepareStatement(handler, ms.getStatementLog());
      // 让 StatementHandler 去处理 Statement
      return handler.query(stmt, resultHandler);
    } finally {
      closeStatement(stmt);
    }
}
StatementHandler 是一个接口,它的继承结构如如下:
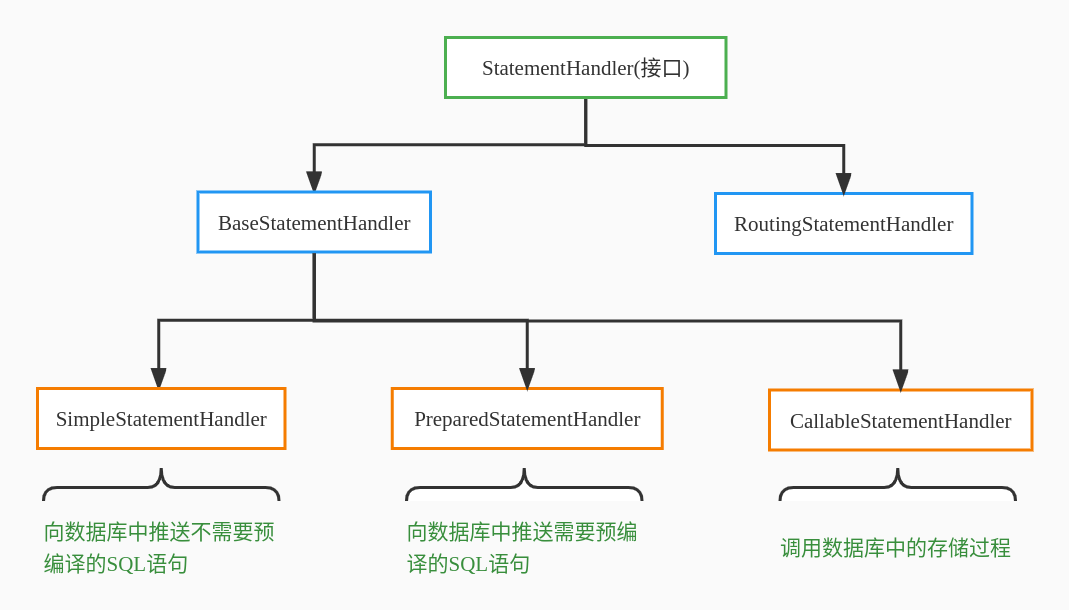
我们通常是直接使用 RoutingStatementHandler 来创建 StatementHandler, 你可以把它理解为 Statement 的简单工厂,根据不同的 StatementType 创建不同的 StatementHandler 对象:
public RoutingStatementHandler(Executor executor, MappedStatement ms, Object parameter, RowBounds rowBounds, ResultHandler resultHandler, BoundSql boundSql) {
    switch (ms.getStatementType()) {
      case STATEMENT:
        delegate = new SimpleStatementHandler(executor, ms, parameter, rowBounds, resultHandler, boundSql);
        break;
      case PREPARED:
        delegate = new PreparedStatementHandler(executor, ms, parameter, rowBounds, resultHandler, boundSql);
        break;
      case CALLABLE:
        delegate = new CallableStatementHandler(executor, ms, parameter, rowBounds, resultHandler, boundSql);
        break;
      default:
        throw new ExecutorException("Unknown statement type: " + ms.getStatementType());
    }
}
这里我们进入 PreparedStatementHandler 的 query 方法看看最终的实现:
public <E> List<E> query(Statement statement, ResultHandler resultHandler) throws SQLException
  {
    // 这里就是直接调用 JDBC 的接口了
    PreparedStatement ps = (PreparedStatement) statement;
    ps.execute();
    // 处理查询返回结果集,调用 ResultSetHandler 来将查询结果处理成 Mapper 中指定的 ResultType 类型的 Java 对象
    return resultSetHandler.handleResultSets(ps);
  }
至此,一个 Mapper 接口的调用流程就完成了。
# Mybatis 插件原理
Mybatis 允许你在已映射语句执行过程中的某一点进行拦截调用。这个调用就是通过 Mybatis 插件来完成的,所以 Mybatis 的插件其实说白就是一组拦截器。
默认情况下,MyBatis 允许使用插件来拦截的方法调用包括:
- Executor(执行器) (update, query, flushStatements, commit, rollback, getTransaction, close, isClosed)
- ParameterHandler(参数处理) (getParameterObject, setParameters)
- ResultSetHandler(结果集处理) (handleResultSets, handleOutputParameters)
- StatementHandler(SQL语句构建) (prepare, parameterize, batch, update, query)
先来看一个插件 Demo:
@Intercepts({@Signature(
  type = Executor.class, // 拦截对象类型,只能是 Executor,ParameterHandler,ResultSetHandler,StatementHandler 中的一个
  method = "query", // 拦截的方法名称,并不是所有的方法都允许拦截
  args = { // 拦截方法的参数,考虑到方法重载,不同的参数对应不同的方法签名
    MappedStatement.class, Object.class, RowBounds.class, ResultHandler.class
  })})
public class TestPlugin implements Interceptor {
  @Override
  public Object intercept(Invocation invocation) throws Throwable
  {
    System.out.println("===== 测试拦截器 ======");
    Object[] args = invocation.getArgs();
    MappedStatement mappedStatement = (MappedStatement) args[0];
    // 打印 SQL 语句
    System.out.println(mappedStatement.getBoundSql(args[1]).getSql());
    return invocation.proceed();
  }

  @Override
  public Object plugin(Object target)
  {
    return Interceptor.super.plugin(target);
  }

  @Override
  public void setProperties(Properties properties)
  {
    Interceptor.super.setProperties(properties);
  }
}
这里两点需要注意的地方:
- type 参数只能是 Executor,ParameterHandler,ResultSetHandler,StatementHandler 中的一个,写其他的不会生效(后面源码会分析为什么不生效)。
- method 是能设置上面允许使用插件来拦截的方法。
- 注意参数的类型和个数要跟你需要拦截的方法一一对应上,尤其是出现方法重载的情况,可能出现实际拦截的方法跟你想要拦截的方法不一致。
写好插件之后,你还需要在 mybatis-config.xml 文档中配置好才会生效:
 <plugins>
    <plugin interceptor="org.mybatis.demo.plugins.TestPlugin"></plugin>
  </plugins>
# 插件的解析
Mybatis 插件的解析实现在 XMLConfigBuilder.pluginElement() 方法:
private void pluginElement(XNode parent) throws Exception {
    if (parent != null) {
      for (XNode child : parent.getChildren()) {
        String interceptor = child.getStringAttribute("interceptor");
        Properties properties = child.getChildrenAsProperties();
        Interceptor interceptorInstance = (Interceptor) resolveClass(interceptor).newInstance();
        interceptorInstance.setProperties(properties);
        // 添加插件
        configuration.addInterceptor(interceptorInstance);
      }
    }
}

public void addInterceptor(Interceptor interceptor) {
    // 将插件添加到拦截链
    interceptorChain.addInterceptor(interceptor);
}
InterceptorChain,是一个拦截器链,我们来看下它的定义:
public class InterceptorChain {

  private final List<Interceptor> interceptors = new ArrayList<>();

  public Object pluginAll(Object target) {
    for (Interceptor interceptor : interceptors) {
      target = interceptor.plugin(target);
    }
    return target;
  }

  public void addInterceptor(Interceptor interceptor) {
    interceptors.add(interceptor);
  }

  public List<Interceptor> getInterceptors() {
    return Collections.unmodifiableList(interceptors);
  }

}
# 插件的应用
IntrceptorChain.pluginAll() 是用来将拦截器匹配到拦截对象的,Executor,ParameterHandler,ResultSetHandler,StatementHandler 在创建的时候都调用了该方法:
public ParameterHandler newParameterHandler(MappedStatement mappedStatement, Object parameterObject, BoundSql boundSql) {
    ParameterHandler parameterHandler = mappedStatement.getLang().createParameterHandler(mappedStatement, parameterObject, boundSql);
    // 使用 InterceptorChain 生成代理对象
    parameterHandler = (ParameterHandler) interceptorChain.pluginAll(parameterHandler);
    return parameterHandler;
}

public ResultSetHandler newResultSetHandler(Executor executor, MappedStatement mappedStatement, RowBounds rowBounds, ParameterHandler parameterHandler,
  ResultHandler resultHandler, BoundSql boundSql) {
    ResultSetHandler resultSetHandler = new DefaultResultSetHandler(executor, mappedStatement, parameterHandler, resultHandler, boundSql, rowBounds);
    // 使用 InterceptorChain 生成代理对象
    resultSetHandler = (ResultSetHandler) interceptorChain.pluginAll(resultSetHandler);
    return resultSetHandler;
}

public StatementHandler newStatementHandler(Executor executor, MappedStatement mappedStatement, Object parameterObject, RowBounds rowBounds, ResultHandler resultHandler, BoundSql boundSql) {
    StatementHandler statementHandler = new RoutingStatementHandler(executor, mappedStatement, parameterObject, rowBounds, resultHandler, boundSql);
    // 使用 InterceptorChain 生成代理对象
    statementHandler = (StatementHandler) interceptorChain.pluginAll(statementHandler);
    return statementHandler;
}

public Executor newExecutor(Transaction transaction, ExecutorType executorType, boolean autoCommit) {
    executorType = executorType == null ? defaultExecutorType : executorType;
    executorType = executorType == null ? ExecutorType.SIMPLE : executorType;
    Executor executor;
    if (ExecutorType.BATCH == executorType) {
      executor = new BatchExecutor(this, transaction);
    } else if (ExecutorType.REUSE == executorType) {
      executor = new ReuseExecutor(this, transaction);
    } else {
      executor = new SimpleExecutor(this, transaction);
    }
    if (cacheEnabled) {
      executor = new CachingExecutor(executor, autoCommit);
    }
    // 使用 InterceptorChain 生成代理对象
    executor = (Executor) interceptorChain.pluginAll(executor);
    return executor;
}
插件的实现原理也非常简单,就是为拦截对象生成一个代理对象,具体实现是通过 Plugin 工具类实现的:
public static Object wrap(Object target, Interceptor interceptor)
{
    // 通过解析拦截器的注解,获得拦截对象方法的签名
    Map<Class<?>, Set<Method>> signatureMap = getSignatureMap(interceptor);
    // 当前对象
    Class<?> type = target.getClass();
    // 如果当前对象的类型很某个拦截器设置的 type 想符合,
    // 则说明需要拦截,并给当前对象生成一个代理对象
    Class<?>[] interfaces = getAllInterfaces(type, signatureMap);
    if (interfaces.length > 0) {
      return Proxy.newProxyInstance(
        type.getClassLoader(),
        interfaces,
        new Plugin(target, interceptor, signatureMap));
    }
    return target;
}
# 插件的调用
所有被拦截成功的对象都会生成代理对象并重新赋值给该对象,所以该对象在执行任何方法的时候都会先调用 Plugin(实现了 InvocationHandler 接口)的 invoke 方法:
public Object invoke(Object proxy, Method method, Object[] args) throws Throwable
  {
    try {
      Set<Method> methods = signatureMap.get(method.getDeclaringClass());
      // 如果方法拦截器匹配成功,则调用拦截器(代理对象)对应的方法
      if (methods != null && methods.contains(method)) {
        // 调用拦截器的 intercept() 方法,并传入 Invocation 对象
        return interceptor.intercept(new Invocation(target, method, args));
      }
      // 直接调用原始对象(被代理对象)的方法
      return method.invoke(target, args);
    } catch (Exception e) {
      throw ExceptionUtil.unwrapThrowable(e);
    }
}
如果匹配拦截器成功,就会调用拦截器的调用拦截器的 intercept() 方法,并传入 Invocation 对象,而我们在处理完拦截任务之后,
可以通过 Invocation.procced() 来调用原始方法(被代理对象方法)
public Object intercept(Invocation invocation) throws Throwable
{
    System.out.println("===== 测试拦截器 ======");
    Object[] args = invocation.getArgs();
    MappedStatement mappedStatement = (MappedStatement) args[0];
    // 打印 SQL 语句
    System.out.println(mappedStatement.getBoundSql(args[1]).getSql());
    // 调用原始对象方法
    return invocation.proceed();
}
# 总结 Mybatis 工作流程
- SqlSessionFactoryBuilder 解析配置文件,包括属性配置、别名配置、拦截器配置、环境(数据源和事务管理器)、Mapper配置等;
- 解析完这些配置后会生成一个 Configration 对象,这个对象中包含了 MyBatis 需要的所有配置,然后会用这个 Configration 对象创建一个 SqlSessionFactory 对象;
- 调用
SqlSessionFactory.openSesison创建 SqlSession 对象,这个对象包含了一个事务管理对象和一个 SQL 执行器(Executor),然后就可以通过 SqlSession 执行各种 CRUD 方法了; - 调用
SqlSession.getMapper方法,获得 Mapper 接口的动态代理对象 MapperProxy; - 调用 Mapper 的 API 其实就是调用 MapperProxy 的
invoke方法,然后依次层层调用MapperMethod.execute()方法 => 调用SqlSession.selectOne()方法 => 调用Executor.query()... - 调用
BaseExecutor.doQuery()方法,创建一个 StatementHandler 对象,这个对象中同时会封装ParameterHandler和ResultSetHandler对象。 然后调用 StatementHandler 预编译参数以及设置参数值,使用 ParameterHandler 来给 SQL 设置参数。 - 调用
StatementHandler.query()方法调用 JDBC 底层增删查改 API,获取执行结果后使用 ResultSetHandler 对结果集进行封装转换,返回处理后的结果集。 MapperProxy的invoke方法中唯一做的就是创建一个MapperMethod对象,然后调用这个对象的execute方法,sqlSession会作为execute方法的入参;
对应的源码调用流程:
- org.apache.ibatis.session.defaults.DefaultSqlSessionFactory#openSession()
- org.apache.ibatis.session.defaults.DefaultSqlSessionFactory#openSessionFromDataSource
- org.apache.ibatis.session.Configuration#newExecutor(Transaction,ExecutorType)
- org.apache.ibatis.session.defaults.DefaultSqlSession#getMapper
- org.apache.ibatis.binding.MapperRegistry#getMapper
- org.apache.ibatis.binding.MapperProxyFactory#newInstance(
MapperProxy<T>) - org.apache.ibatis.binding.MapperProxy#invoke
- org.apache.ibatis.binding.MapperMethod#execute
- org.apache.ibatis.session.defaults.DefaultSqlSession#selectOne(String, Object)
- org.apache.ibatis.session.defaults.DefaultSqlSession#selectList(String, Object, RowBounds, ResultHandler)
- org.apache.ibatis.executor.CachingExecutor#query(MappedStatement, Object, RowBounds, ResultHandler, CacheKey, BoundSql)
- org.apache.ibatis.executor.BaseExecutor#query(MappedStatement, Object, RowBounds, ResultHandler, CacheKey, BoundSql)
- org.apache.ibatis.executor.BaseExecutor#queryFromDatabase
- org.apache.ibatis.executor.SimpleExecutor#doQuery
- org.apache.ibatis.executor.statement.PreparedStatementHandler#query
- org.apache.ibatis.executor.resultset.DefaultResultSetHandler#handleResultSets
源码解读工程地址在:https://gitee.com/blackfox/mybatis-3.5.12 (opens new window)。基于 Mybatis 最新版 v3.5.12,核心流程都加了中文注释,里面还附带的 demo 工程,方便学习者调试。
本站博文如非注明转载则均属作者原创文章,引用或转载无需申请版权或者注明出处,如需联系作者请加微信: geekmaster01