Ceph-08 搭建 Ceph S3 对象存储服务
尼采
凡不能毁灭你的,必将使你强大。
前面我们分别讲了 Ceph 块存储之 RBD 和 Ceph 文件系统。本文我们来聊聊如何搭建 Ceph 的对象存储服务(RGW)。
# Ceph 对象网关
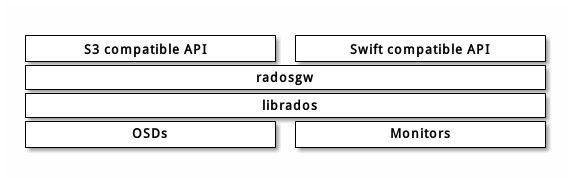
Ceph 对象网关是一个构建在 librados 之上的对象存储接口,它为应用程序访问Ceph 存储集群提供了一个 RESTful 风格的网关 。
Ceph 对象存储支持 2 种接口:
- 兼容S3: 提供了对象存储接口,兼容 亚马逊S3 RESTful 接口的一个大子集。
- 兼容Swift: 提供了对象存储接口,兼容 Openstack Swift 接口的一个大子集。
Ceph 对象存储使用 Ceph 对象网关守护进程( radosgw ),它是个与 Ceph 存储集群交互的 FastCGI 模块。 因为它提供了与 OpenStack Swift 和 Amazon S3 兼容的接口, RADOS 要有它自己的用户管理。 Ceph 对象网关可与 Ceph FS 客户端或 Ceph 块设备客户端共用一个存储集群。 S3 和 Swift 接口共用一个通用命名空间,所以你可以用一个接口写入数据然后用另一个接口读取数据。
# 演示环境
- 系统版本:Ubuntu-18.04 LTS
- Ceph 版本:12.2.13 luminous (stable)
- 节点信息:ceph1(192.168.1.101), ceph2(192.168.1.102), ceph3(192.168.1.103)
# 安装 Ceph 对象存储网关
# ceph-deploy 安装
ceph-deploy install --rgw ceph1 ceph2 ceph3
# 手动安装,分别在各个节点执行
apt-get install install ceph-rgw
# 配置 ceph.conf
新增 rgw 相关配置,这里我在 ceph1, ceph2, ceph3 三个节点都安装了 rgw 服务。
public_network = 192.168.1.0/24

max_open_files = 131072

osd_pool_default_min_size = 2
osd_pool_default_size = 2

[mon]
mon_allow_pool_delete = true

[client.rgw.ceph1]
# 绑定网关服务端口
rgw_frontends = "civetweb port=8001 num_threads=20"
# 绑定多个端口
#rgw_frontends = "civetweb port=80+443s ssl_certificate=/etc/ceph/rgw.pem num_threads=20"
rgw_dns_name = s3.rockyang.org #绑定域名
rgw_thread_pool_size = 1000
rgw_curl_wait_timeout_ms = 100000
rgw_override_bucket_index_max_shards = 3
rgw_max_chunk_size = 1048576
rgw_cache_lru_size = 1000000
rgw_bucket_default_quota_max_objects = 10000000

[client.rgw.ceph2]
rgw_frontends = "civetweb port=8001 num_threads=20"
rgw_dns_name = s3.rockyang.org
rgw_thread_pool_size = 1000
rgw_curl_wait_timeout_ms = 100000
rgw_override_bucket_index_max_shards = 3
rgw_max_chunk_size = 1048576
rgw_cache_lru_size = 1000000
rgw_bucket_default_quota_max_objects = 10000000

[client.rgw.ceph3]
rgw_frontends = "civetweb port=8001 num_threads=20"
rgw_dns_name = s3.rockyang.org
rgw_thread_pool_size = 1000
rgw_curl_wait_timeout_ms = 100000
rgw_override_bucket_index_max_shards = 3
rgw_max_chunk_size = 1048576
rgw_cache_lru_size = 1000000
rgw_bucket_default_quota_max_objects = 10000000
# 创建 RGW 实例
ceph-deploy --overwrite-conf rgw create ceph1 ceph2 ceph3
创建成功之后就可以通过 http://192.168.1.101:8001 访问服务了,正常的话应该会返回如下内容:
<?xml version="1.0" encoding="UTF-8"?>
<ListAllMyBucketsResult xmlns="http://s3.amazonaws.com/doc/2006-03-01/">
<Owner>
    <ID>anonymous</ID>
    <DisplayName></DisplayName>
</Owner>
<Buckets></Buckets>
</ListAllMyBucketsResult>
注意: 我这是使用了
rgw_frontends = "civetweb port=8001 num_threads=20"修改了默认端口的了,如果没修改话,那么请使用 7480 端口。
改完配置记得重启 RGW 实例:
ssh ceph1 systemctl restart ceph-radosgw.target
ssh ceph2 systemctl restart ceph-radosgw.target
ssh ceph3 systemctl restart ceph-radosgw.target
# 创建用户
radosgw-admin user create --uid="s3user" --display-name="s3user"
--uid 和 display-name 分别是用户 ID 和显示名称,返回的信息中 access_key 和 secret_key 需要保存下来,客户端授权需要用到。
"keys": [
    {
        "user": "s3user",
        "access_key": "RS73DA9565QY2Z7Z0G9Q",
        "secret_key": "8jPUdNPQtd1VNwUpWMPAFzjUVxW3dT4H8vLPezPO"
    }
],
用户的常用操作:
# 查看用户信息
radosgw-admin user info --uid=s3user
# 修改用户信息
radosgw-admin user modify --uid s3user --display-name 'new name'  --max_buckets 2000
# 禁用用户
radosgw-admin user suspend --uid s3user
# 启用用户
radosgw-admin user enable --uid s3user
# 列出用户
radosgw-admin user list
# 删除用户
radosgw-admin user rm --uid joy
# 创建 Key
radosgw-admin key create --uid s3user --key-type=s3  --gen-access-key --gen-secret
# 删除 key
radosgw-admin key rm --uid s3user --key-type=s3 --access-key <access_key>
# 设置配额
# 基于用户的配额
radosgw-admin quota set --quota-scope=user --uid=s3user --max-size 1024
# 基于 bucket 的配额
radosgw-admin quota set --quota-scope=bucket --uid=s3user --max-size 100
# 启用配额
radosgw-admin quota enable --quota-scope=user --uid s3user
统计配额数据
# 显示 s3user 用户下的配额使用情况
radosgw-admin usage show --uid s3user
{
    "entries": [],
    "summary": []
}
# 分阶段统计
radosgw-admin usage show --uid s3user --start-date 2019-03-19 21:00:00 --end-date 2019-03-19 22:00:00
{
    "entries": [],
    "summary": []
}
关于配额的作用域的问题,如果你对 user 和 bucket 两个都进行配置的话,则那个先到,使用哪一个。
# 使用 s3cmd 操作 Ceph 对象存储
(1)在客户端安装 s3cmd:
apt-get install s3cmd -y
(2)生成配置文件
[root@192-168-5-70 ~]# s3cmd --configure

Enter new values or accept defaults in brackets with Enter.
Refer to user manual for detailed description of all options.

Access key and Secret key are your identifiers for Amazon S3. Leave them empty for using the env variables.
Access Key: D028HA7T16KJHU2602YA                     # 粘贴服务端生成的Access Key
Secret Key: RWczKVORMdDBw2mtgLs2dUPq2xrCehnjOtB6pHPY # 粘贴服务端生成的Secret Key
Default Region [US]:                                 # 直接回车即可

Use "s3.amazonaws.com" for S3 Endpoint and not modify it to the target Amazon S3.
S3 Endpoint [s3.amazonaws.com]: 192.168.1.221               # 输入对象存储的IP地址

Use "%(bucket)s.s3.amazonaws.com" to the target Amazon S3. "%(bucket)s" and "%(location)s" vars can be used
if the target S3 system supports dns based buckets.
DNS-style bucket+hostname:port template for accessing a bucket [%(bucket)s.s3.amazonaws.com]:  %(bucket).192.168.1.221   #输入对象存储的 bucket 地址

Encryption password is used to protect your files from reading
by unauthorized persons while in transfer to S3
Encryption password:                             # 空密码回车
Path to GPG program [/usr/bin/gpg]:              # 回车

When using secure HTTPS protocol all communication with Amazon S3
servers is protected from 3rd party eavesdropping. This method is
slower than plain HTTP, and can only be proxied with Python 2.7 or newer
Use HTTPS protocol [Yes]: no                        #是否使用https,选no

On some networks all internet access must go through a HTTP proxy.
Try setting it here if you can not connect to S3 directly
HTTP Proxy server name:                             #不使用代理,留空回车

New settings:
  Access Key: D028HA7T16KJHU2602YA
  Secret Key: RWczKVORMdDBw2mtgLs2dUPq2xrCehnjOtB6pHPY
  Default Region: US
  S3 Endpoint: 192.168.5.91
  DNS-style bucket+hostname:port template for accessing a bucket:  %(bucket).192.168.5.91
  Encryption password:
  Path to GPG program: /usr/bin/gpg
  Use HTTPS protocol: False
  HTTP Proxy server name:
  HTTP Proxy server port: 0

Test access with supplied credentials? [Y/n]  # 不测试 no

Save settings? [y/N] y                  # y 要保存配置文件
Configuration saved to '/root/.s3cfg'   # 最后配置文件保存的位置/root.s3cfg
最后贴上我的一个配置文档:
[default]
access_key = MTAU54XU6ILI6097SNK8
access_token =
add_encoding_exts =
add_headers =
bucket_location = US
ca_certs_file =
cache_file =
check_ssl_certificate = True
check_ssl_hostname = True
cloudfront_host = cloudfront.amazonaws.com
default_mime_type = binary/octet-stream
delay_updates = False
delete_after = False
delete_after_fetch = False
delete_removed = False
dry_run = False
enable_multipart = True
encoding = UTF-8
encrypt = False
expiry_date =
expiry_days =
expiry_prefix =
follow_symlinks = False
force = False
get_continue = False
gpg_command = /usr/bin/gpg
gpg_decrypt = %(gpg_command)s -d --verbose --no-use-agent --batch --yes --passphrase-fd %(passphrase_fd)s -o %(output_file)s %(input_file)s
gpg_encrypt = %(gpg_command)s -c --verbose --no-use-agent --batch --yes --passphrase-fd %(passphrase_fd)s -o %(output_file)s %(input_file)s
gpg_passphrase =
guess_mime_type = True
host_base = s3.rockyang.org:8001
host_bucket = %(bucket).s3.rockyang.org
human_readable_sizes = False
invalidate_default_index_on_cf = False
invalidate_default_index_root_on_cf = True
invalidate_on_cf = False
kms_key =
limit = -1
limitrate = 0
list_md5 = False
log_target_prefix =
long_listing = False
max_delete = -1
mime_type =
multipart_chunk_size_mb = 15
multipart_max_chunks = 10000
preserve_attrs = True
progress_meter = True
proxy_host =
proxy_port = 0
put_continue = False
recursive = False
recv_chunk = 65536
reduced_redundancy = False
requester_pays = False
restore_days = 1
restore_priority = Standard
secret_key = TfYnLGXnOsQ6eXd8j98T3zYlwoewDFwTRwhqygFU
send_chunk = 65536
server_side_encryption = False
signature_v2 = False
signurl_use_https = False
simpledb_host = sdb.amazonaws.com
skip_existing = False
socket_timeout = 300
stats = False
stop_on_error = False
storage_class =
urlencoding_mode = normal
use_http_expect = False
use_https = False
use_mime_magic = True
verbosity = WARNING
website_endpoint = http://%(bucket)s.s3-website-%(location)s.amazonaws.com/
website_error =
website_index = index.html
这里有几个需要注意的地方
bucket_location只能是 US, 其他国家的貌似不行host_base如果 civetweb port 不是默认端口 7480 的话,需要带上端口号host_bucket跟 host_base 域名保持一致
# s3cmd 操作指南
# 创建一个名为 test 的 bucket
s3cmd mb s3://test
# 删除 test bucket
s3cmd rb s3:/test
# 写入文件到 test bucket 中
s3cmd put hello.txt s3://test
# 列出 test bucket 中的文件列表:
s3cmd ls s3://test
# 读取 bucket 中的 tempfile 文件到本地:
s3cmd get s3://test/hello.txt hello1.txt
通过 s3cmd 上传的文件默认是不能通过浏览器直接访问的,需要为 ceph 对象存储设置 policy
# 1. 准备 policy json 文件
{
  "Version": "2012-10-17",
  "Statement":[
      {
       "Sid":"0",
       "Effect":"Allow",
       "Principal":"*",
       "Action":"s3:GetObject",
       "Resource":"arn:aws:s3:::<bucket_name>/*"
      }
  ]
}
配置说明:
Version: 有两个值可选:默认是 2008-10-17;对于 Jewel 以后的版本,只能使用另外的一个值 2012-10-17。
Statement: 是policy 的主体,该参数为必需参数。里面放的是列表。
"Statement": [{...},{...},{...}]Sid: 是一个可选的标识,当由多条statement 的时候,我们需要为每个statement 分配 一个Sid作为标识
Effect: 是必需元素,它来指定这条statement 的作用是允许还是拒绝,它只有两个值( Allow 和 Deny )
Principal: 使用Principal策略中的元素来指定允许或拒绝访问资源的用户。
Action: 用来描述指定动作(例如:s3:GetObject),你可以为
Action元素指定多个值。"Action": [ "s3:GetObject", "s3:PutObject", "s3:DeleteObject"]Action 支持使用通配符 (*) ,例如,以下
Action元素适用于所有 S3 操作。"Action": "s3:*"Resource: 定特定的资源集合,写法格式:
arn:aws:s3:::<bucket_name>/*
# such as
arn:aws:s3:::my_bucket/*
更多配置详情,请参考: https://docs.amazonaws.cn/IAM/latest/UserGuide/reference_policies_elements.html
# 2. 设置策略模式
这一条命令使得 <Bucket> 中的所有内容权限为Public(只读),包括续传的文件。其中,<File> 为上一步创建的 json文件。
# command format
s3cmd setpolicy <File> s3://<Bucket>/ --acl-public
# demo
s3cmd setpolicy policy.json s3://test/ --acl-public
这一条命令使得 <Bucket> 的文件目录权限为 Public(只读),即可通过URL看到 <Bucket> 中的文件目录。
# usage
s3cmd setacl --acl-public s3://<Bucket>/
# e.g
s3cmd setacl --acl-public s3://test/
接下来你就可以直接通过 http 网关直接访问 test bucket 中的文件了:
curl http://192.168.1.101:8001/test/hello.txt
Hello, Ceph Object Storage
# 参考文档
- http://docs.ceph.org.cn/install/install-ceph-gateway/ (opens new window)
- http://docs.ceph.org.cn/radosgw/config/ (opens new window)
- https://docs.ceph.com/docs/master/radosgw/ (opens new window)
- https://docs.ceph.com/docs/master/radosgw/s3/ (opens new window)
- https://docs.ceph.com/docs/master/radosgw/rgw-cache/ (opens new window)
- https://docs.ceph.com/docs/master/radosgw/bucketpolicy/ (opens new window)
本站博文如非注明转载则均属作者原创文章,引用或转载无需申请版权或者注明出处,如需联系作者请加微信: geekmaster01